How to control a vibration test in EDM using a Labview MQTT Client
Introduction
MQTT is an OASIS standard messaging protocol for the Internet of Things (IoT). It is designed as an extremely lightweight publish/subscribe messaging transport that is ideal for connecting remote devices with a small code footprint and minimal network bandwidth.
Implementing MQTT in EDM allows users to remotely monitor and operate environmental tests (vibration, temperature, humidity) and take measurements using EDM DSA.
Each purchase of Crystal Instruments MQTT extension for EDM will include three coding languages client demo program and scripts, such as C#, Python and LabVIEW. This article will focus on the various components of the LabVIEW diagrams. For more details, please refer to the EDM MQTT Technical User Manual.
MQTT LabVIEW Demo Client
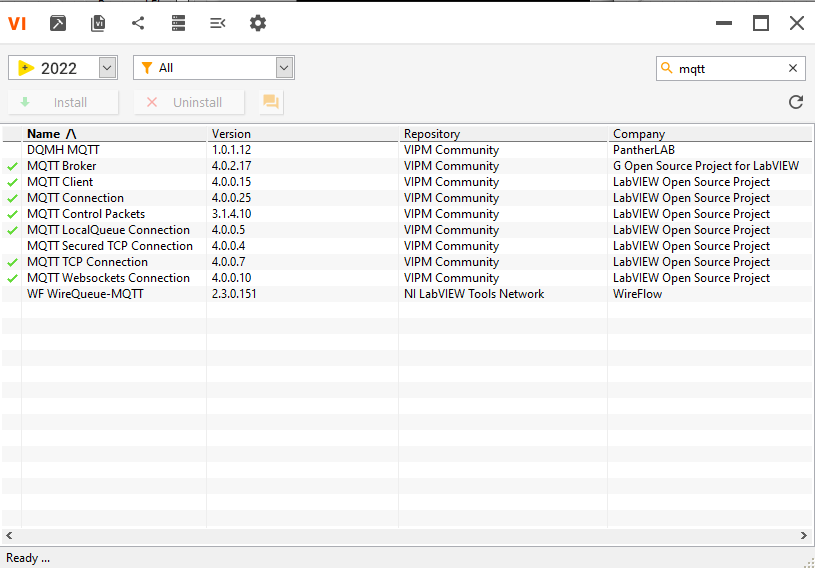
The EDM MQTT Client LabVIEW Demo utilizes the LabVIEW Open Source Project MQTT packages available via the LabVIEW VI Package Manager.
To download the MQTT packages, go to the search bar in the VI Package Manager and type in MQTT. It will list the various MQTT packages that LabVIEW has available.
Download MQTT Broker should download most of the MQTT packages in the list. Packages without a checkmark next to its name will also have to be downloaded.
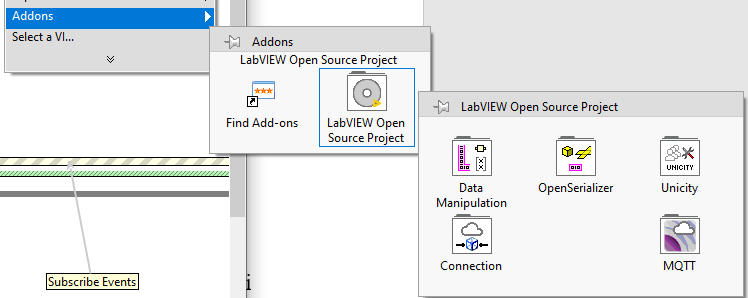
After downloading the MQTT packages, right click in the Block Diagram of a new vi file to open the functions menu. Go to Addons > LabVIEW Open Source Project > MQTT and it will reveal the MQTT functions and some MQTT example vi nodes.

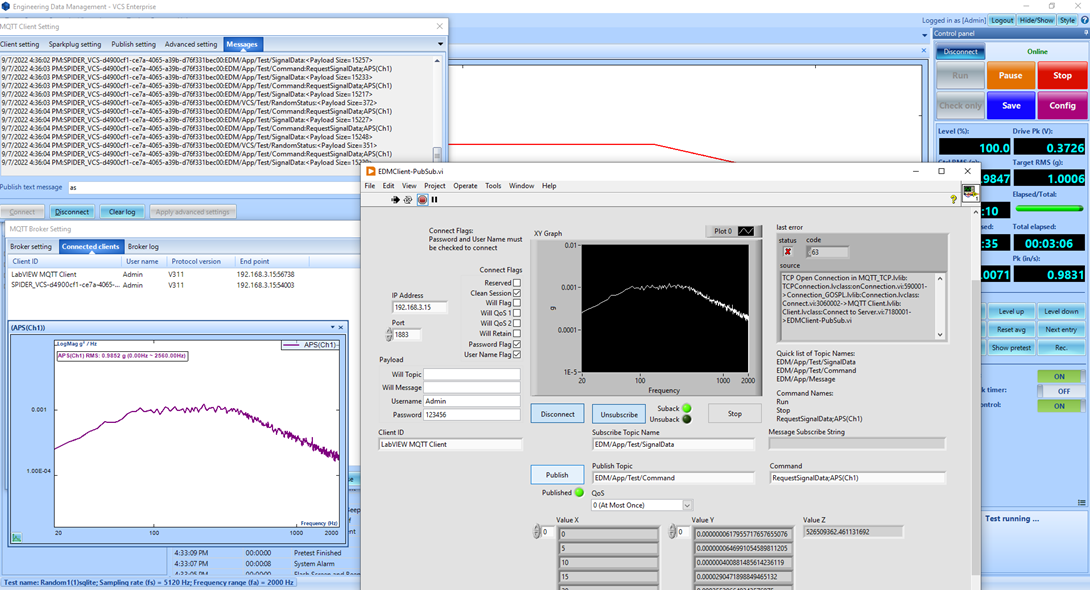
Front Panel
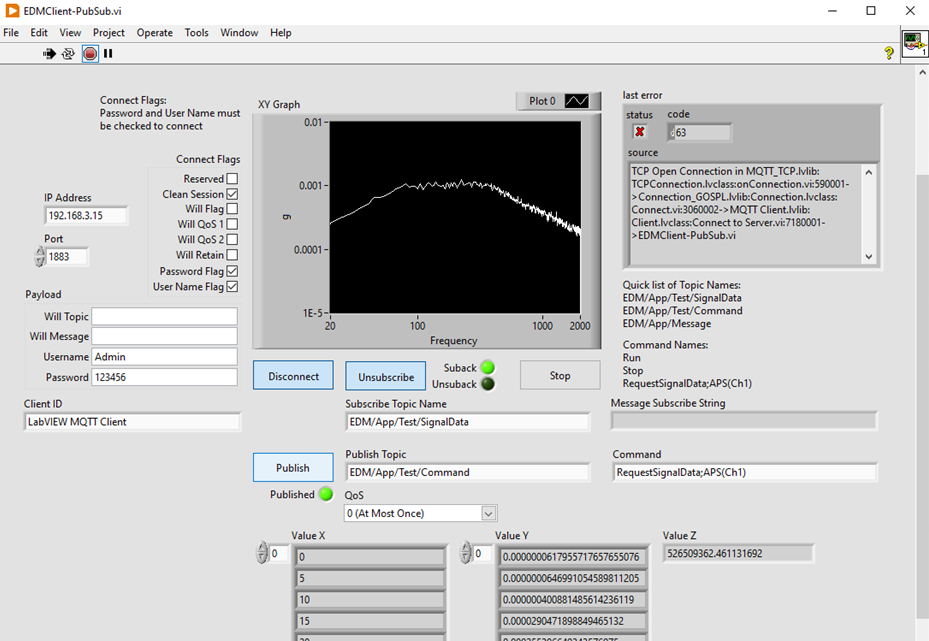
The Front Panel of the LabVIEW MQTT Client Demo contains the connection parameter settings, XY graph for plotting signal data, error message box, subscribe and publish topic commands, and arrays for X, Y and Z of the signal data.
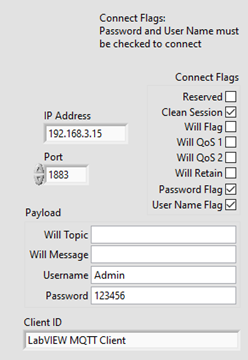
The connection parameter settings include the payload, connection flags, client ID, and TCP configuration required to connect to the EDM MQTT broker. Please note that the connect flags for the password and username must be checked when sending a payload with a username and password to connect to the EDM MQTT broker.

After inputting the correct connection parameter settings, clicking the Connect button will attempt a connection between the LabVIEW MQTT Client to the EDM MQTT broker. It may be necessary to reconnect if it does not succeed the first time.
Once the LabVIEW MQTT Client connects to the EDM MQTT broker, the client ID should show up in the EDM MQTT broker Connected Clients tab.

The LabVIEW MQTT Client is now ready to subscribe or publish topics to EDM. Please note that since this is a basic LabVIEW MQTT Client Demo, the user may need to add additional displays to the front panel when requesting data such as the test status or input channel information.
Block Diagram

The illustration above shows a brief overview of the entire block diagram used in making the LabVIEW MQTT Client Demo, from the start of the MQTT client, the main function loop of every event, to the disconnection and stop function of the MQTT client (with any occurred error messages). The entire block diagram also has comments pointing to various nodes to help users understand the MQTT package and the various parts used to make the demo.
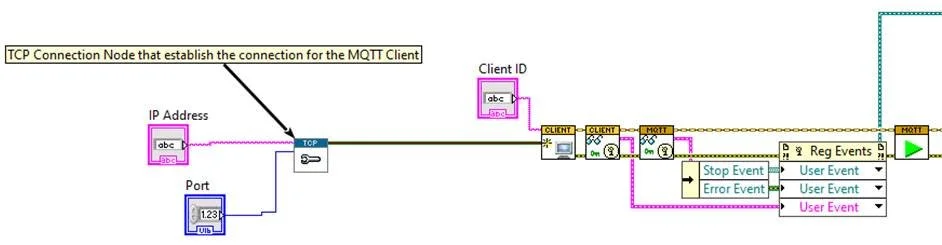
Starting from the left side of the block diagram are the TCP configuration and client ID control nodes for the Create MQTT Client node. At the top of each MQTT node is the MQTT Client in and out. The bottom of each MQTT node has the error in and out. The MQTT Client and Error both go through each MQTT function node until the last MQTT Destroy node.
The MQTT client goes through the Read Public Event nodes and into the Start node after its creation.

Next is the event structure after the Start node that encompasses all of the LabVIEW MQTT Client Demo functions (from subscribe, publish, connect, stop, public events and so on).
The following illustration shows the connect button event structure where it takes in the payload and connect flags to connect to the EDM MQTT broker.


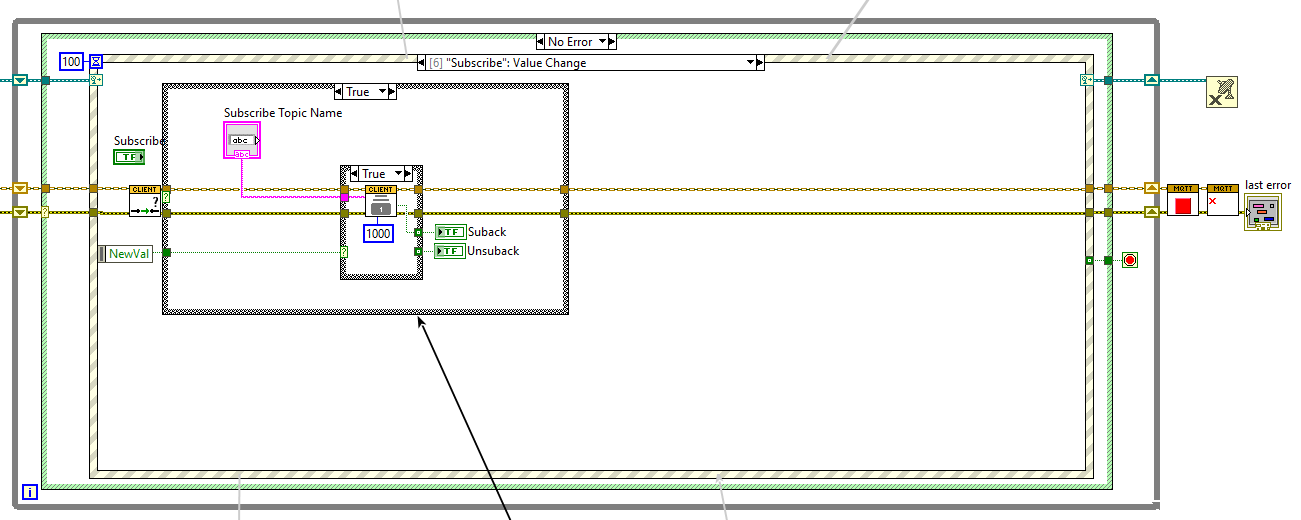
The subscribe event structure is where the Subscribe (Scalar) node takes in the topic name and timeout. It will stay subscribed to the inputted topic name unless the user clicks the subscribe button to unsubscribe. It is possible to have multiple Subscribe (Scalar) nodes or a Subscribe (Array) node to subscribe to multiple topics.


The publish event structure is where the Publish (Raw Payload) node takes in the topic name, command in bytes and quality of service. The publish node must be a raw payload in order for EDM to read in the command from the LabVIEW MQTT Client Demo. Once the payload is sent to EDM and EDM receives the command correctly, it will send out the requested topic subscribed by the LabVIEW MQTT Client Demo.


Once the subscribed topic sent by EDM is received, it will then decode the payload in the public event structure. First, in this structure, it must determine the type of topic name to handle how to display the data from the getTopicName node on the left side. Once it determines the topic, it then decodes the payload in bytes.
In the case of a signal data request, the payload is a string that contains data about the signal from its name, signal frame data, create date and so on. For this demo, it extracts the signal frame data and plots the X and Y data points. The block diagram will have comments to explain the process of displaying the X and Y data points of the signal frame data.

The last portion of the block diagram contains the MQTT package Stop and Destroy nodes and an error out dialog box. The error out dialog box occurs whenever the demo encounters an error or if the user stops the demo.